Hashicorp Vault Configuration and Auto Unsealing using AWS KMS

Contents
- 1. Introduction
- Architecture Overview
- 2. AWS Configuration
- Step 1: Create AWS KMS Key (Auto-Unseal)
- Step 2: Create IAM Policy for KMS
- Step 3: Create IAM Role for EC2
- Step 4: Launch 3 EC2 Instances
- Step 5: Security Group Configuration
- Step 6: Vault Installation (Automated via EC2 User Data)
- Step 7: Create Network Load Balancer
- Step 8: Generate TLS Certificate on Vault 1 and Moving it to Every Vault
- Step 9: Vault Configuration (vault.hcl)
- Step 10: Start Vault
- Step 11: Initialize Cluster Only Vault1
- Step 12: Verify Cluster
- Step 13: Troubleshooting
- Step 14: How To Confirm Everything Is Working
- Conclusion
1. Introduction
What is HashiCorp Vault?
HashiCorp Vault is a secrets management system used to securely store and control access to sensitive data such as:
- API keys
- Database credentials
- Tokens
- Certificates
- Encryption keys
Vault provides:
- Secure secret storage
- Dynamic secret generation
- Encryption as a service
- Audit logging
- Access control via policies
In this project, we deploy a production-ready High Availability Vault cluster on AWS using:
- 3 EC2 Instances
- Integrated Storage (Raft)
- AWS KMS Auto-Unseal
- Self-Signed TLS
- Network Load Balancer
Architecture Overview
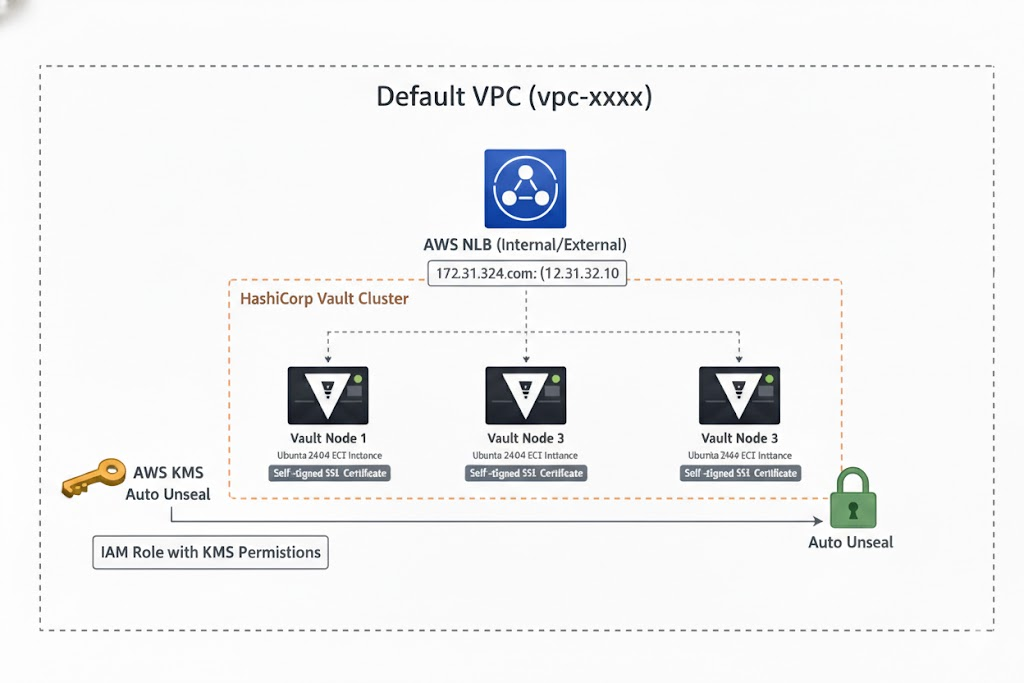
Components Used
- 3× Ubuntu 24.04 EC2 instances
- AWS KMS key (for auto-unseal)
- IAM Role with KMS permissions
- Network Load Balancer (TCP 8200)
- Private IP (Same VPC)
- Self-signed SSL certificate
- Raft integrated storage
2. AWS Configuration
Step 1: Create AWS KMS Key (Auto-Unseal)
- Go to AWS Console
- Search for KMS
- Click Create Key
Choose:
- Key Type: Symmetric
- Usage: Encrypt and Decrypt
- Enable automatic rotation
- Create key
Copy:
- Key ID
- Key ARN
- Region
Example:
1
2
913e09f9-5487e-495d-9f82-5764dsa23ww3
Region: ap-southeast-1
Step 2: Create IAM Policy for KMS
Go to:
IAM → Policies → Create Policy → JSON
1
2
3
4
5
6
7
8
9
10
11
12
13
14
15
{
  "Version": "2012-10-17",
  "Statement": [
    {
      "Sid": "VaultKMSUnseal",
      "Effect": "Allow",
      "Action": [
        "kms:Encrypt",
        "kms:Decrypt",
        "kms:DescribeKey"
      ],
      "Resource": "arn:aws:kms:ap-southeast-1:ACCOUNT_ID:key/913e09f9-5487e-495d-9f82-5764dsafdww3"
    }
  ]
}
Save as:
1
vault-kms-policy
Step 3: Create IAM Role for EC2
IAM → Roles → Create Role
- Trusted entity: EC2
Attach:
- vault-kms-policy
- Create role:
1
vault-iam-role
Step 4: Launch 3 EC2 Instances
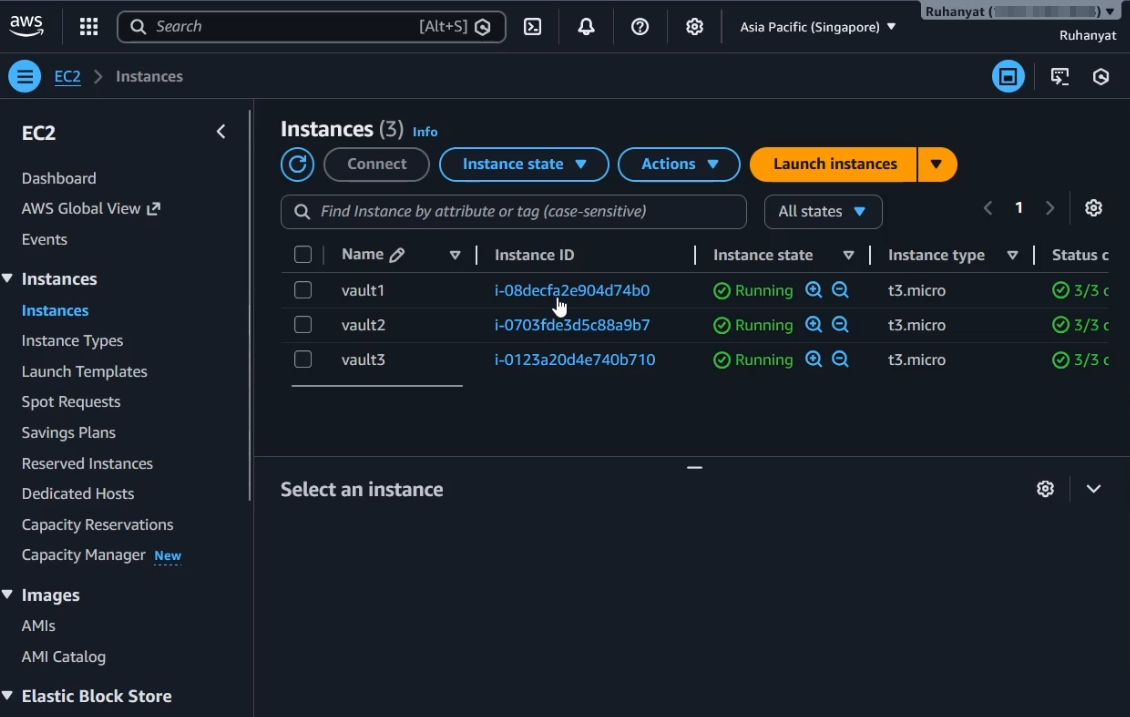
Create:
| Node | Private IP |
|---|---|
| vault1 | 172.31.46.251 |
| vault2 | 172.31.41.123 |
| vault3 | 172.31.35.171 |
Requirements:
- Ubuntu 24.04
- Same VPC
- Same subnet (recommended)
- Attach IAM Role:
vault-iam-role - Please change the IP with your Private Ip of EC2
Step 5: Security Group Configuration
Allow:
| Port | Purpose |
|---|---|
| 8200 | Vault API |
| 8201 | Raft Cluster |
| 22 | SSH |
Step 6:. Vault Installation (Automated via EC2 User Data)
Instead of manually switching to root and installing packages, this configuration is executed automatically during EC2 launch using User Data.
Add the following script in the User Data section while creating the EC2 instance:
1
2
3
4
5
6
7
8
9
10
11
12
13
14
15
16
17
18
19
20
21
22
23
24
25
26
27
28
29
30
31
32
33
34
35
36
37
38
39
40
41
42
43
44
45
46
47
48
49
50
51
52
53
54
#!/bin/bash
set -e

# Log output for debugging
exec > >(tee /var/log/user-data.log | logger -t user-data ) 2>&1

echo "===== Starting Vault Installation ====="

# Update system
apt update -y
apt upgrade -y

# Install required packages
apt install -y \
    wget \
    gpg \
    lsb-release \
    unzip \
    curl \
    zip \
    openssl \
    ca-certificates \
    gnupg \
    software-properties-common

echo "===== Required packages installed ====="

# Add HashiCorp GPG key
wget -O- https://apt.releases.hashicorp.com/gpg | \
gpg --dearmor -o /usr/share/keyrings/hashicorp-archive-keyring.gpg

# Add HashiCorp repository
echo "deb [arch=$(dpkg --print-architecture) \
signed-by=/usr/share/keyrings/hashicorp-archive-keyring.gpg] \
https://apt.releases.hashicorp.com $(lsb_release -cs) main" \
> /etc/apt/sources.list.d/hashicorp.list

# Update repository and install Vault
apt update -y
apt install -y vault

echo "===== Vault Installed ====="

# Verify installation
vault version

echo "===== Vault Installation Completed ====="

# Prepare Raft storage
mkdir -p /data/raft
chown -R vault:vault /data
chmod -R 750 /data

echo "===== Raft Storage Prepared ====="
What Changed Compared to Manual Steps
Instead of:
sudo su- Running commands manually
- Preparing storage manually
Everything now:
- Runs automatically at first boot
- Logs to
/var/log/user-data.log - Installs Vault consistently across all 3 nodes
- Prepares Raft storage automatically
Step 6: Create Target Group
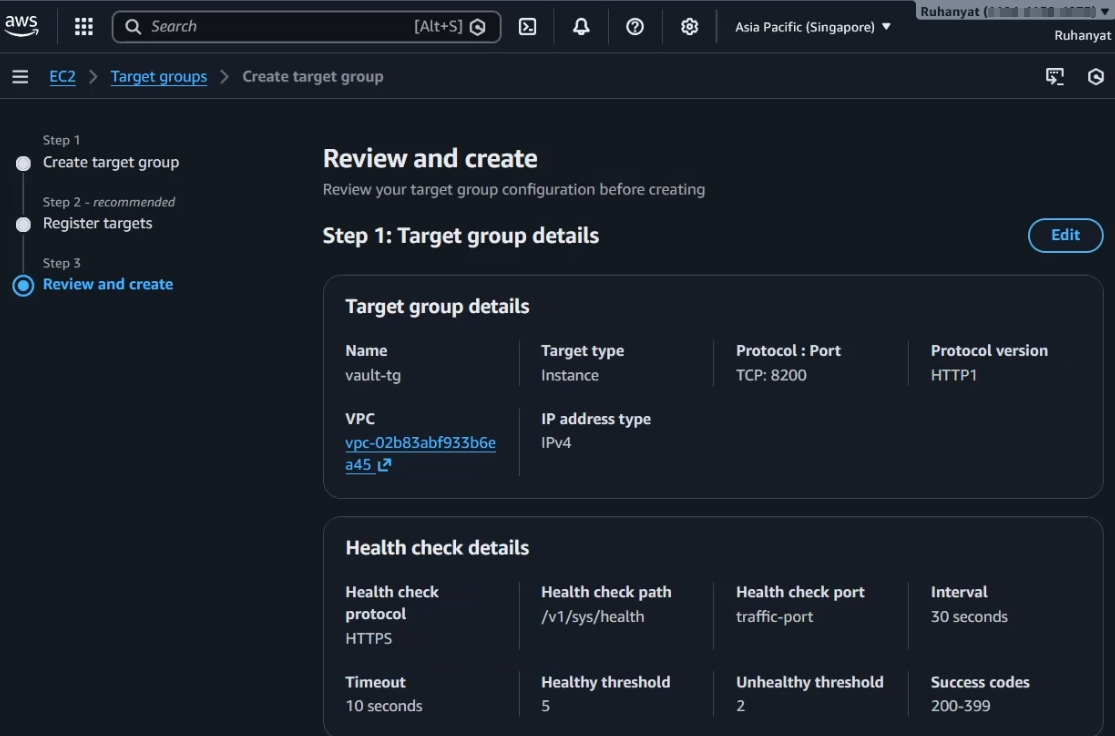
EC2 → Target Groups → Create Target Group
- Target Type: Instance
- Protocol: TCP
- Port: 8200
Health Check:
- Protocol: HTTPS
- Path:
/v1/sys/health
Register all 3 instances.
Step 7: Create Network Load Balancer
EC2 → Load Balancers → Create Load Balancer
- Type: Network Load Balancer
- Listener: TCP 8200
- Target Group: Vault TG
This creates one stable endpoint for Vault clients.
Step 8: Generate TLS Certificate on Vault 1 and Moving it to Every Vault
1
2
3
4
openssl req -x509 -nodes -days 3650 -newkey rsa:4096 \
-keyout vault.key -out vault.crt \
-subj "/CN=172.31.46.251" \
-addext "subjectAltName = IP:172.31.46.251,IP:172.31.41.123,IP:172.31.35.171"
Zip and copy to other nodes:
1
zip vault-tls.zip vault.crt vault.key
Moving To Multiple EC2
On Vault-2 (open a separate Instance Connect session):
- Create the directory where the TLS file will go:
1
mkdir -p /home/ubuntu
On Vault-1 session:
- Use
cat+copy-pasteto transfer the zip contents:
1
base64 vault-tls.zip- This outputs a long Base64 string.
- Copy that entire string.
- Use
On Vault-2:
- Create a file and paste the Base64 string into it:
1
cat > vault-tls.b64
Paste the string, then press
Ctrl+D.Decode it:
1
base64 -d vault-tls.b64 > vault-tls.zip
- Now
vault-tls.zipis on Vault-2.
Repeat the same for Vault-3.
On each node, unzip:
1
unzip vault-tls.zip -d /etc/vault.d/tls
Move certs: Do it for Every Vaults
1
2
3
4
5
mkdir -p /etc/vault.d/tls
mv vault.crt vault.key /etc/vault.d/tls/
chown -R vault:vault /etc/vault.d/tls
chmod 600 /etc/vault.d/tls/vault.key
chmod 644 /etc/vault.d/tls/vault.crt
Trust certificate:
1
2
cp /etc/vault.d/tls/vault.crt /usr/local/share/ca-certificates/vault.crt
update-ca-certificates
Step 9: Vault Configuration (vault.hcl)
Example for vault1:
1
2
3
4
5
6
7
8
9
10
11
12
13
14
15
16
17
18
19
20
21
22
23
24
25
26
27
28
29
30
31
32
33
34
storage "raft" {
  path    = "/data/raft"
  node_id = "vault1"

  retry_join {
    leader_api_addr     = "https://172.31.46.251:8200"
    leader_ca_cert_file = "/etc/vault.d/tls/vault.crt"
  }
  retry_join {
    leader_api_addr     = "https://172.31.41.123:8200"
    leader_ca_cert_file = "/etc/vault.d/tls/vault.crt"
  }
  retry_join {
    leader_api_addr     = "https://172.31.35.171:8200"
    leader_ca_cert_file = "/etc/vault.d/tls/vault.crt"
  }
}

listener "tcp" {
  address         = "0.0.0.0:8200"
  cluster_address = "0.0.0.0:8201"
  tls_cert_file   = "/etc/vault.d/tls/vault.crt"
  tls_key_file    = "/etc/vault.d/tls/vault.key"
}

seal "awskms" {
  region     = "ap-southeast-1"
  kms_key_id = "913eds49f9-175e-495d-9f82-df4sa2sdfw3559"
}

api_addr      = "https://172.31.46.251:8200"
cluster_addr  = "https://172.31.46.251:8201"
disable_mlock = true
ui            = true
Vault2:
1
2
3
4
5
6
7
8
9
10
11
12
13
14
15
16
17
18
19
20
21
22
23
24
25
26
27
28
29
30
31
32
33
34
storage "raft" {
  path    = "/data/raft"
  node_id = "vault2"

  retry_join {
    leader_api_addr     = "https://172.31.46.251:8200"
    leader_ca_cert_file = "/etc/vault.d/tls/vault.crt"
  }
  retry_join {
    leader_api_addr     = "https://172.31.41.123:8200"
    leader_ca_cert_file = "/etc/vault.d/tls/vault.crt"
  }
  retry_join {
    leader_api_addr     = "https://172.31.35.171:8200"
    leader_ca_cert_file = "/etc/vault.d/tls/vault.crt"
  }
}

listener "tcp" {
  address         = "0.0.0.0:8200"
  cluster_address = "0.0.0.0:8201"
  tls_cert_file   = "/etc/vault.d/tls/vault.crt"
  tls_key_file    = "/etc/vault.d/tls/vault.key"
}

seal "awskms" {
  region     = "ap-southeast-1"
  kms_key_id = "913eds49f9-175e-495d-9f82-df4sa2sdfw3559"
}

api_addr      = "https://172.31.41.123:8200"
cluster_addr  = "https://172.31.41.123:8201"
disable_mlock = true
ui            = true
vault3 :
1
2
3
4
5
6
7
8
9
10
11
12
13
14
15
16
17
18
19
20
21
22
23
24
25
26
27
28
29
30
31
32
33
34
35
storage "raft" {
  path    = "/data/raft"
  node_id = "vault3"

  retry_join {
    leader_api_addr     = "https://172.31.46.251:8200"
    leader_ca_cert_file = "/etc/vault.d/tls/vault.crt"
  }
  retry_join {
    leader_api_addr     = "https://172.31.41.123:8200"
    leader_ca_cert_file = "/etc/vault.d/tls/vault.crt"
  }
  retry_join {
    leader_api_addr     = "https://172.31.35.171:8200"
    leader_ca_cert_file = "/etc/vault.d/tls/vault.crt"
  }
}

listener "tcp" {
  address         = "0.0.0.0:8200"
  cluster_address = "0.0.0.0:8201"
  tls_cert_file   = "/etc/vault.d/tls/vault.crt"
  tls_key_file    = "/etc/vault.d/tls/vault.key"
}

seal "awskms" {
  region     = "ap-southeast-1"
  kms_key_id = "913eds49f9-175e-495d-9f82-df4sa2sdfw3559"
}

api_addr      = "https://172.31.35.171:8200"
cluster_addr  = "https://172.31.35.171:8201"
disable_mlock = true
ui            = true
Step 10: Start Vault
1
2
3
systemctl enable vault
systemctl start vault
systemctl status vault
- Do it On each vault
Step 11: Initialize Cluster Only Vault1
1
2
3
4
export VAULT_ADDR="https://172.31.46.251:8200"
export VAULT_SKIP_VERIFY=true

vault operator init
Save:
- Root Token
- Recovery Keys
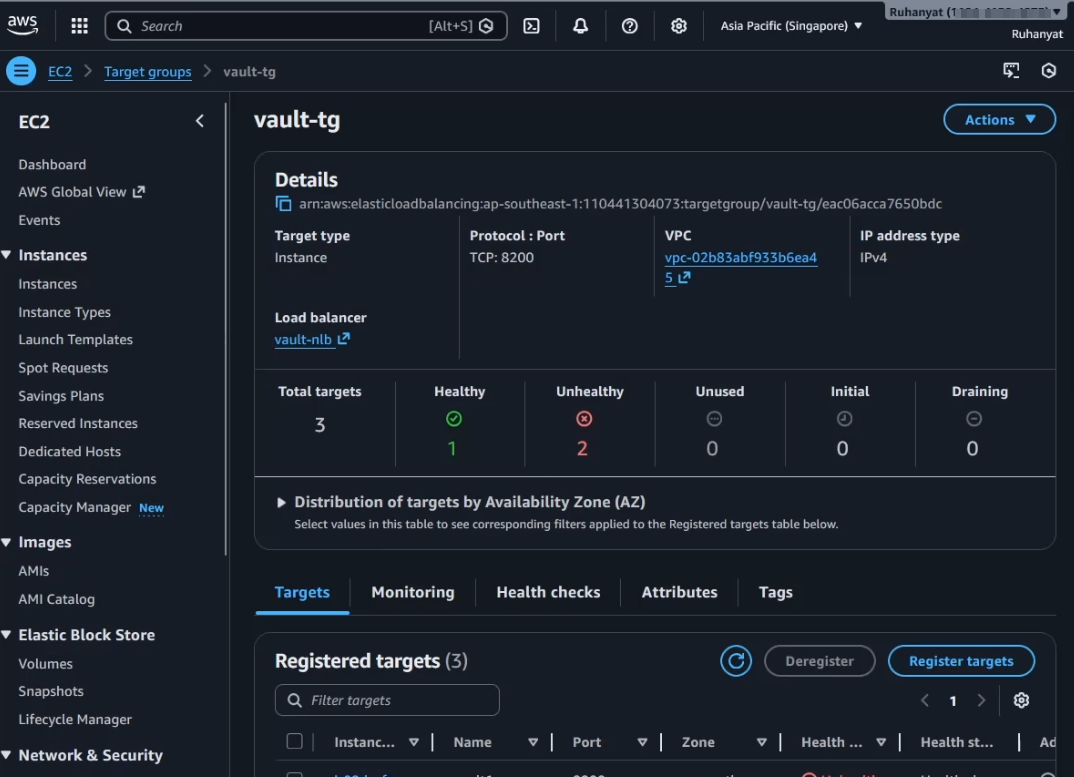
Step 12: Verify Cluster
Check status:
1
vault status
Expected:
1
2
3
4
Seal Type: awskms
Sealed: false
Storage Type: raft
HA Enabled: true
Check raft peers:
1
2
vault login <ROOT_TOKEN>
vault operator raft list-peers
Expected:
1
2
3
vault1 leader
vault2 follower
vault3 follower
Step 13: Troubleshooting
If nodes do not join:
1
vault operator raft join https://172.31.46.251:8200
Check logs:
1
journalctl -xeu vault -f
Step 14: How To Confirm Everything Is Working
1. Service Running
1
systemctl status vault
2. KMS Auto-Unseal Working
1
vault status
Should show:
1
2
Sealed: false
Seal Type: awskms
3. Raft Cluster Healthy
1
vault operator raft list-peers
Must show 3 nodes and 1 leader.
4. Kill Leader Test
1
vault operator step-down
Another node should become leader.
Conclusion

This project was inspired by and based on the CNCBD 2026 workshop organized by the CNCF Bangladesh (CNCF BD) community. The workshop provided an excellent hands-on learning experience for deploying a production-ready HashiCorp Vault cluster on AWS with Raft storage and AWS KMS auto-unseal.
After attending the workshop, I implemented this project myself, applying the concepts learned and exploring additional configurations for a high-availability setup.
The CNCF BD community also shared a comprehensive resource that guided the workshop. You can check it out here.
I highly recommend participating in such workshops organized by CNCF BD—they are very well-structured and provide practical insights into cloud-native technologies.